Microsoft 365 is a SaaS solution that has become the first choice for many companies in terms of remote work organization and advanced security options for data access. It leverages cloud-based architecture to provide a single point of access for your favourite apps and tools like the Office package.
The key to success is integration and synchronization between different apps. As you can imagine, Microsoft ensures synchronization and integration for their tools, but what about integration with third-party apps?
Integration Scenario
Let’s imagine that you have a dedicated CRM app such as Salesforce, Dynamics CRM, or Bullhorn that helps you organize your customer data and internal company resources. Typically these kind of applications store employee information, including sensitive data like their address or salary. Due to the data type, access to this app is restricted to a few people only. However, this list is always up to date, so you want to present company resources on one of the Microsoft 365 services, accessible to every employee, albeit only publicly available information. Your third-party app already provides an API for data access, so you need an integration service which will publish it to your SharePoint site.

Let's start with SharePoint
Our integration will involve multiple Microsoft 365 services such as Teams, Planner or OneDrive. But first we want to be able to synchronize with SharePoint. This might be to create personal space or include a new employee in a particular private group. But for the sake of this post, let’s assume we want to add information to a specific SharePoint List.
SharePoint REST API
One of the first results you can find after googling ‘SharePoint integration’ is SharePoint REST API v1. It’s a primary Microsoft REST API dedicated to SharePoint, and allows the user to interact with SharePoint data with the use of any technology that supports REST web requests. Your client application can perform CRUD operations using Web REST technologies combined with OData syntax. What’s more, there is a SharePoint Client library – CSOM – that you can use if you don’t want to build HTTP requests on your own. Let’s give it a try.
Configuring an application in Azure AD
The very first thing you have to do is to register your application in Azure AD. Go to the Azure Active Directory, App registrations section, and click ‘new registration’. After successful registration, your application receives a unique Application ID and Directory ID. These identifiers are crucial in the authentication process.
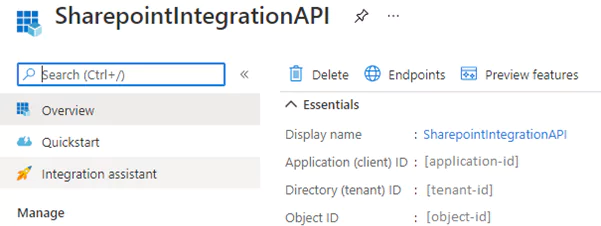
Next, we have to configure API permissions. We’re adding delegated permissions to manage all SharePoint sites. Please visit this link to see this process step by step. Delegated permission type means that your application needs to access the API as the signed-in user. We will have a closer look at different types of permission later.

Authenticating with Azure AD
To be able to access your SharePoint site, you will need to authenticate yourself. By trying to fetch some SharePoint data with the client library, you are in fact sending http requests under the hood to SharePoint REST API. This simply means that you need to acquire an access token and apply it to each request being sent by CSOM. Microsoft recommends using their sample AuthenticationManager class for CSOM authentication. Let’s have a look at the most important parts of the mentioned class:

The GetContext method returns a client context with an event handler responsible for adding an access token to the request’s headers. The method below is the one which eventually makes a POST request to the Microsoft OAuth 2.0 endpoint.
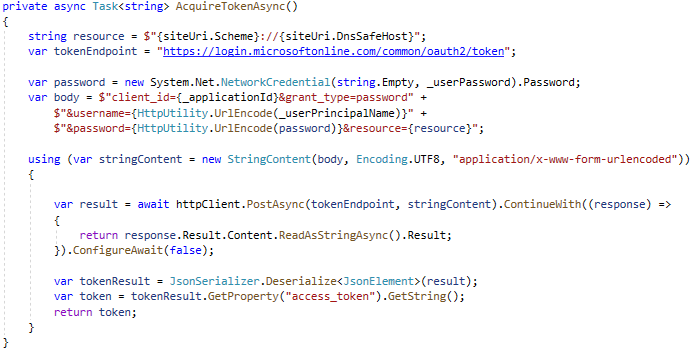
Because we configured our app to use the delegated permissions type, we have to use the OAuth resource owner password credentials grant as an authentication protocol. This requires the following information in the body of your request:
- client_id – the application ID that we generated during app registration
- grant_type – must be set to “password”
- username – the user’s email address
- password – the user’s password
- resource – your SharePoint site URL
Updating the SharePoint list
Following successful authentication, we can finally try to access the SharePoint Site and its main entities. I created a SharePoint Site with a list called “Employees”, which has four columns: Title, Name, Surname and Position, and I manually added one list item. In my integration API I defined a service which implements the following interface for basic operations with the site and its lists:

The code below presents how to get a specific list with the CSOM client library and how to create a new list item.
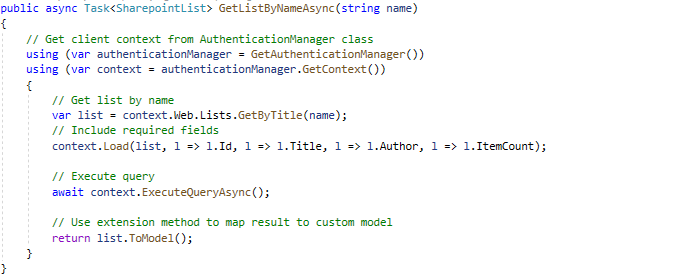
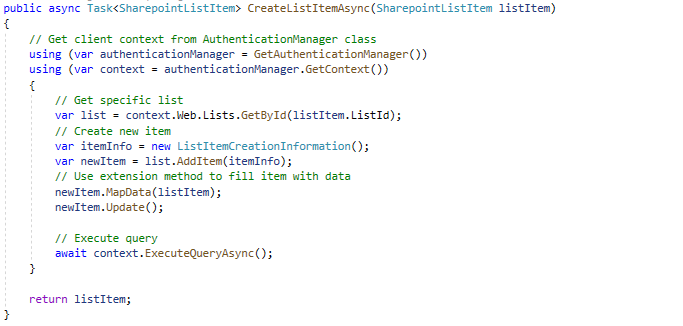
Success! We can authenticate the app in Azure AD by entering our credentials, we can get entities like a list from the SharePoint site and manipulate its data using our integration service.
But what about the other integrations? Do we have to use a dedicated SDK for every service from MS 365 that we want to use? I asked myself this question and I found this awesome alternative – Microsoft Graph API.
Graph API
Microsoft Graph is a powerful gateway to data and intelligence in Microsoft 365. It offers you access to a tremendous amount of data like SharePoint, Excel, Microsoft Teams, OneDrive or Outlook through a single endpoint: https://graph.microsoft.com.
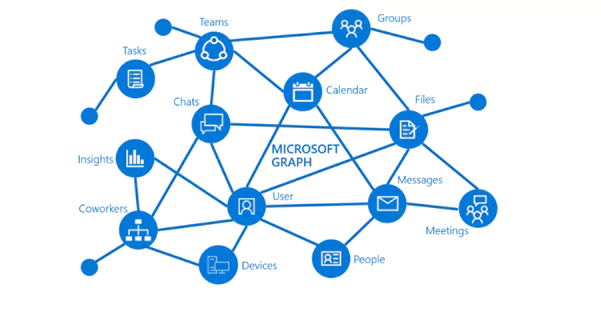
You can use REST APIs or SDKs to easily access different endpoints, without the need to develop dedicated authentication handlers etc. I encourage you to play with it using Graph Explorer – a developer tool that handles the authentication process and provides plenty of template requests with their corresponding responses. I admire how orchestrated and compact Graph API is; building a query is very intuitive and transparent. For instance, this simple request:
https://graph.microsoft.com/v1.0/sites/root/lists/d7689e2b-941a-4cd3-bb24-55cddee54294/items/6
fetches a specific list item from a specific list.
Graph API brings a bunch of new possibilities – for example, in our case, for each new employee added to the Employee SharePoint list, we could send a welcome email or even organize a meeting with the employee’s manager using Outlook mail API and Outlook calendar API. It all sounds very promising, so let’s check it out in practice.
Graph API SDK
Let’s try to fulfil a contract with an interface we created for SharePoint data providers. After installing NuGet packages we need to choose the authentication provider. This time we don’t need to develop any authentication handlers, because SDK already serves authentication providers for different OAuth 2.0 protocols. The code below demonstrates how to initialize the SDK Client with the use of a Username/Password Provider.
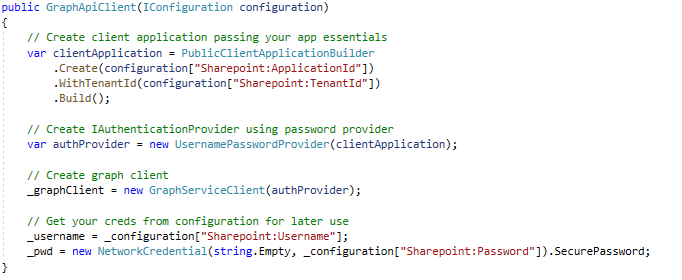
Pretty trivial, you only need to know your app ID and tenant ID, because I assume that you already know your username and password 😊
We’ve got our Graph client that is ready to authenticate, so let’s get the list of employees and then create a new list item.

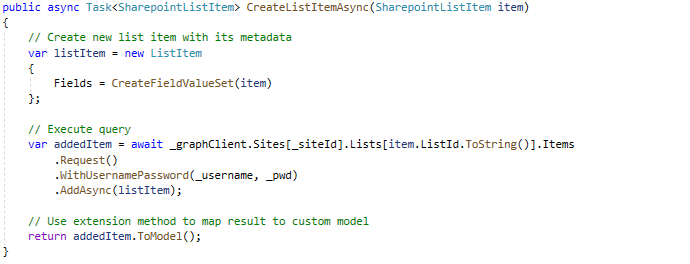
As you can see, the SDK client is easy to use and at least as intuitive as the original REST API. This code gets a specific list where we can find its corresponding identifier and then successfully create a new list item.
API Permissions
So far, we have been working with delegated permissions, signing in on behalf of a real existing user providing the user’s email and password. It might work well for a web application, where we redirect the user to a login endpoint and ask him or her to manually log in, but for a web API storing someone’s credentials doesn’t sound like the best option available. In this case, we would rather assign an individual identity to a web API and let it take responsibility for all actions instead of impersonating someone. In the Azure API permissions section, you can add “Application permissions” instead of delegated ones.

Then, similarly, you select an API – Sites in this case – and choose one of the available options, for instance Sites.Manage.All. Then navigate to the ‘Certificates & secrets’ section on the left pane, where you can generate credentials for your confidential application. This can be achieved in two ways:
- You can upload a certificate
- You can generate a client secret
For a higher level of assurance, Microsoft recommends using a certificate, but I will use a client secret in this case.
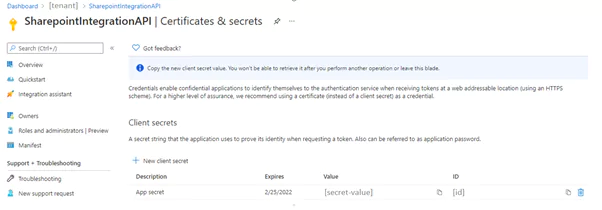
This value should be stored in a secure place such as KeyVault, because now it’s enough to know the Client Secret and Application ID – which is public – to manage all your SharePoint sites. If your app should only access a specific site, it’s reasonable to limit permissions only to selected sites by choosing Sites.Selected permission. It’s worth mentioning that this feature was recently added to Graph API by Microsoft, after numerous user requests, because in the past you could only grant access to all SharePoint sites. In fact, it was contrary to the principle of last privilege as you were forced to make your app almost omnipotent in terms of SharePoint access.
Last but not least is to change the authentication provider we use for instantiating the Graph Client.

As you can see, we replaced the username / password provider with the client credentials provider, and we used a generated client secret instead of user credentials.
Summary
Microsoft 365 services are open to integration and give you a lot of room to adjust them to your personal needs. All bound together, Graph API, Azure AD and Azure security features make the entire platform not only extensible but also very secure. I called synchronization and integration the “key to success” at the beginning of this article, and I am absolutely sure that the Cloud Solutions which Microsoft offers reflect it in the best possible way.
If you have any questions on the options for integration with the Microsoft 365 platform or related topics, let’s chat!
Author: Przemysław Wąs, Full Stack Developer


